| prev | next | ||||||||
|---|---|---|---|---|---|---|---|---|---|
|
|
经过前面几节的练习,可能你会有一些疑惑:
- 为什么 pod 不就绪 (Ready) 的话,
kubernetes不会将流量重定向到该 pod,这是怎么做到的? - 前面访问服务的方式是通过
port-forword将 pod 的端口暴露到本地,不仅需要写对 pod 的名字,一旦 deployment 重新创建新的 pod,pod 名字和 IP 地址也会随之变化,如何保证稳定的访问地址呢?。 - 如果使用 deployment 部署了多个 Pod 副本,如何做负载均衡呢?
kubernetes 提供了一种名叫 Service 的资源帮助解决这些问题,它为 pod 提供一个稳定的 Endpoint。Service 位于 pod 的前面,负责接收请求并将它们传递给它后面的所有pod。一旦服务中的 Pod 集合发生更改,Endpoints 就会被更新,请求的重定向自然也会导向最新的 pod。
我们先来看看 Service 默认使用的 ClusterIP 类型,首先做一些准备工作,在之前的 hellok8s:v2 版本上加上返回当前服务所在的 hostname 功能,升级到 v3 版本。
package main

import (
	"fmt"
	"io"
	"net/http"
	"os"
)

func hello(w http.ResponseWriter, r *http.Request) {
	host, _ := os.Hostname()
	io.WriteString(w, fmt.Sprintf("[v3] Hello, Kubernetes!, From host: %s", host))
}

func main() {
	http.HandleFunc("/", hello)
	http.ListenAndServe(":3000", nil)
}
Dockerfile 和之前保持一致,打包 tag=v3 并推送到远程仓库。
docker build . -t guangzhengli/hellok8s:v3

docker push guangzhengli/hellok8s:v3
修改 deployment 的 hellok8s 为 v3 版本。执行 kubectl apply -f deployment.yaml 更新 deployment。
apiVersion: apps/v1
kind: Deployment
metadata:
  name: hellok8s-deployment
spec:
  replicas: 3
  selector:
    matchLabels:
      app: hellok8s
  template:
    metadata:
      labels:
        app: hellok8s
    spec:
      containers:
        - image: guangzhengli/hellok8s:v3
          name: hellok8s-container
接下来是 Service 资源的定义,我们使用 ClusterIP 的方式定义 Service,通过 kubernetes 集群的内部 IP 暴露服务,当我们只需要让集群中运行的其他应用程序访问我们的 pod 时,就可以使用这种类型的Service。首先创建一个 service-hellok8s-clusterip.yaml 文件。
apiVersion: v1
kind: Service
metadata:
  name: service-hellok8s-clusterip
spec:
  type: ClusterIP
  selector:
    app: hellok8s
  ports:
  - port: 3000
    targetPort: 3000
首先通过 kubectl get endpoints 来看看 Endpoint。被 selector 选中的 Pod,就称为 Service 的 Endpoints。它维护着 Pod 的 IP 地址,只要服务中的 Pod 集合发生更改,Endpoints 就会被更新。通过 kubectl get pod -o wide 命令获取 Pod 更多的信息,可以看到 3 个 Pod 的 IP 地址和 Endpoints 中是保持一致的,你可以试试增大或减少 Deployment 中 Pod 的 replicas,观察 Endpoints 会不会发生变化。
kubectl apply -f service-hellok8s-clusterip.yaml

kubectl get endpoints
# NAME                         ENDPOINTS                                          AGE
# service-hellok8s-clusterip   172.17.0.10:3000,172.17.0.2:3000,172.17.0.3:3000   10s

kubectl get pod -o wide
# NAME                                   READY   STATUS    RESTARTS   AGE    IP           NODE
# hellok8s-deployment-5d5545b69c-24lw5   1/1     Running   0          112s   172.17.0.7   minikube
# hellok8s-deployment-5d5545b69c-9g94t   1/1     Running   0          112s   172.17.0.3   minikube
# hellok8s-deployment-5d5545b69c-9gm8r   1/1     Running   0          112s   172.17.0.2   minikube
# nginx                                  1/1     Running   0          112s   172.17.0.9   minikube

kubectl get service
# NAME                         TYPE        CLUSTER-IP      EXTERNAL-IP   PORT(S)    AGE
# service-hellok8s-clusterip   ClusterIP   10.104.96.153   <none>        3000/TCP   10s
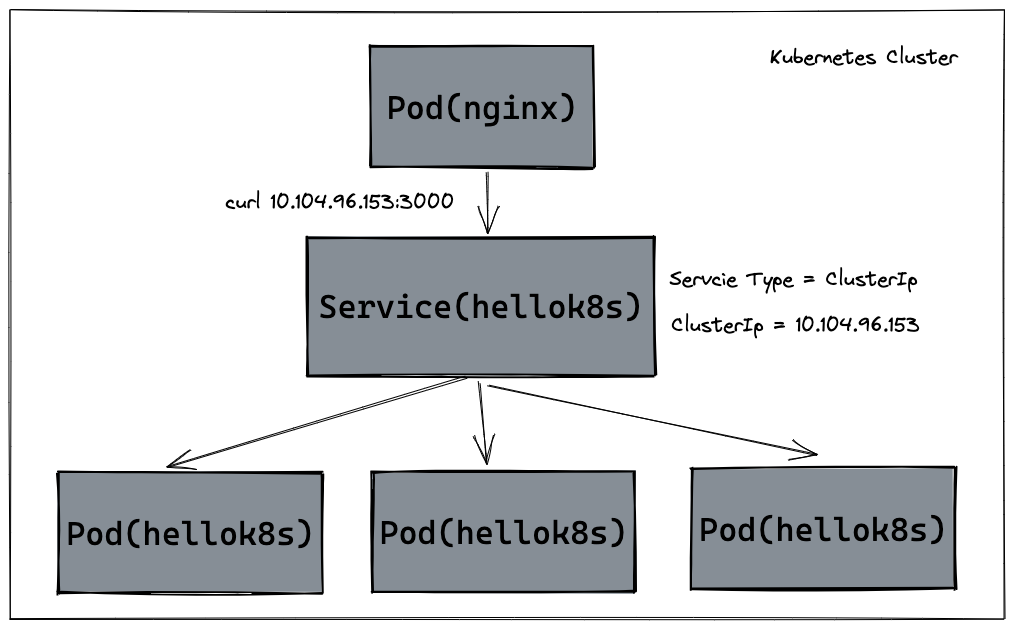
接着我们可以通过在集群其它应用中访问 service-hellok8s-clusterip 的 IP 地址 10.104.96.153 来访问 hellok8s:v3 服务。
这里通过在集群内创建一个 nginx 来访问 hellok8s 服务。创建后进入 nginx 容器来用 curl 命令访问 service-hellok8s-clusterip 。
apiVersion: v1
kind: Pod
metadata:
  name: nginx
  labels:
    app: nginx
spec:
  containers:
    - name: nginx-container
      image: nginx
kubectl get pods
# NAME READY STATUS RESTARTS AGE
# hellok8s-deployment-5d5545b69c-24lw5 1/1 Running 0 27m
# hellok8s-deployment-5d5545b69c-9g94t 1/1 Running 0 27m
# hellok8s-deployment-5d5545b69c-9gm8r 1/1 Running 0 27m
# nginx 1/1 Running 0 41m
kubectl get service
# NAME TYPE CLUSTER-IP EXTERNAL-IP PORT(S) AGE
# service-hellok8s-clusterip ClusterIP 10.104.96.153 <none> 3000/TCP 10s
kubectl exec -it nginx-pod -- /bin/bash
# root@nginx-pod:/# curl 10.104.96.153:3000
# [v3] Hello, Kubernetes!, From host: hellok8s-deployment-5d5545b69c-9gm8r
# root@nginx-pod:/# curl 10.104.96.153:3000
#[v3] Hello, Kubernetes!, From host: hellok8s-deployment-5d5545b69c-9g94t可以看到,我们多次 curl 10.104.96.153:3000 访问 hellok8s Service IP 地址,返回的 hellok8s:v3 hostname 不一样,说明 Service 可以接收请求并将它们传递给它后面的所有 pod,还可以自动负载均衡。你也可以试试增加或者减少 hellok8s:v3 pod 副本数量,观察 Service 的请求是否会动态变更。调用过程如下图所示:
除了上述的 ClusterIp 的方式外,Kubernetes ServiceTypes 允许指定你所需要的 Service 类型,默认是 ClusterIP。Type 的值包括如下:
ClusterIP:通过集群的内部 IP 暴露服务,选择该值时服务只能够在集群内部访问。 这也是默认的ServiceType。NodePort:通过每个节点上的 IP 和静态端口(NodePort)暴露服务。NodePort服务会路由到自动创建的ClusterIP服务。 通过请求<节点 IP>:<节点端口>,你可以从集群的外部访问一个NodePort服务。LoadBalancer:使用云提供商的负载均衡器向外部暴露服务。 外部负载均衡器可以将流量路由到自动创建的NodePort服务和ClusterIP服务上。ExternalName:通过返回CNAME和对应值,可以将服务映射到externalName字段的内容(例如,foo.bar.example.com)。 无需创建任何类型代理。
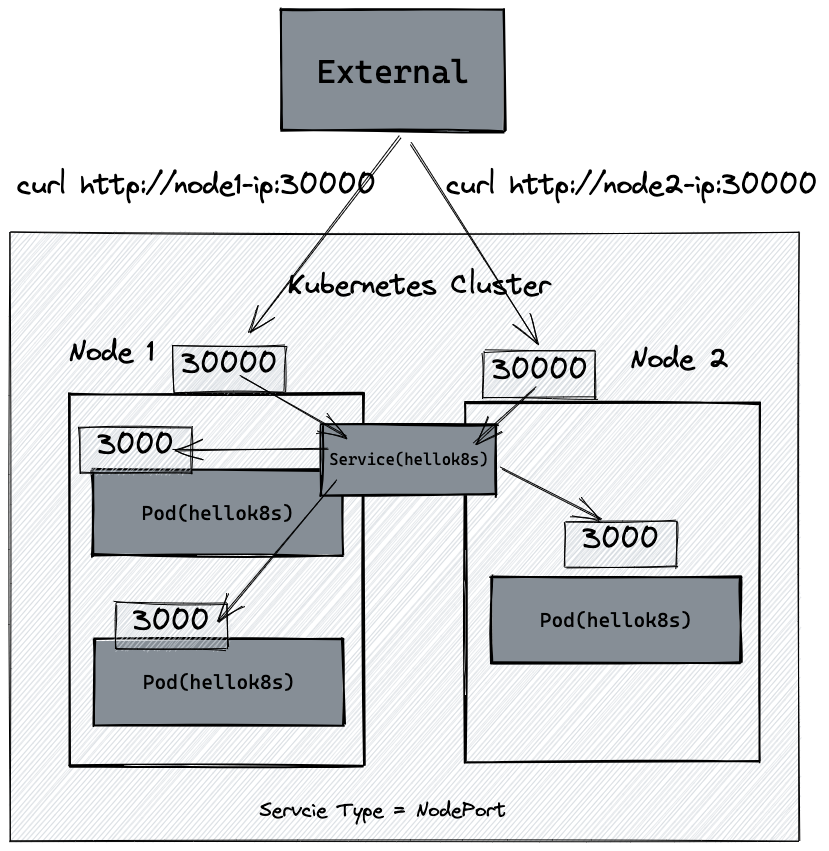
我们知道kubernetes 集群并不是单机运行,它管理着多台节点即 Node,可以通过每个节点上的 IP 和静态端口(NodePort)暴露服务。如下图所示,如果集群内有两台 Node 运行着 hellok8s:v3,我们创建一个 NodePort 类型的 Service,将 hellok8s:v3 的 3000 端口映射到 Node 机器的 30000 端口 (在 30000-32767 范围内),就可以通过访问 http://node1-ip:30000 或者 http://node2-ip:30000 访问到服务。
这里以 minikube 为例,我们可以通过 minikube ip 命令拿到 k8s cluster node IP地址。下面的教程都以我本机的 192.168.59.100 为例,需要替换成你的 IP 地址。
minikube ip
# 192.168.59.100
接着以 NodePort 的 ServiceType 创建一个 Service 来接管 pod 流量。通过minikube 节点上的 IP 192.168.59.100 暴露服务。 NodePort 服务会路由到自动创建的 ClusterIP 服务。 通过请求 <节点 IP>:<节点端口> -- 192.168.59.100:30000,你可以从集群的外部访问一个 NodePort 服务,最终重定向到 hellok8s:v3 的 3000 端口。
apiVersion: v1
kind: Service
metadata:
  name: service-hellok8s-nodeport
spec:
  type: NodePort
  selector:
    app: hellok8s
  ports:
  - port: 3000
    nodePort: 30000
创建 service-hellok8s-nodeport Service 后,使用 curl 命令或者浏览器访问 http://192.168.59.100:30000 可以得到结果。
kubectl apply -f service-hellok8s-nodeport.yaml

kubectl get service
# NAME                         TYPE        CLUSTER-IP       EXTERNAL-IP   PORT(S)          AGE
# service-hellok8s-nodeport    NodePort    10.109.188.161   <none>        3000:30000/TCP   28s

kubectl get pods
# NAME                                   READY   STATUS    RESTARTS   AGE
# hellok8s-deployment-5d5545b69c-24lw5   1/1     Running   0          27m
# hellok8s-deployment-5d5545b69c-9g94t   1/1     Running   0          27m
# hellok8s-deployment-5d5545b69c-9gm8r   1/1     Running   0          27m

curl http://192.168.59.100:30000
# [v3] Hello, Kubernetes!, From host: hellok8s-deployment-5d5545b69c-9g94t

curl http://192.168.59.100:30000
# [v3] Hello, Kubernetes!, From host: hellok8s-deployment-5d5545b69c-24lw5
如果本地使用 Docker Desktop(minikube start --driver=docker)的话,那你大概率无法通过minikube ip获取到的ip地址来请求,因为 docker 部分网络限制导致无法通过 ip 直连 docker container,这代表 NodePort 类型的 Service、Ingress 组件都无法通过 minikube ip 提供的 ip 地址来访问。无法直接访问Node IP。你可以通过minikube service service-hellok8s-nodeport --url来公开服务,然后通过curl或者浏览器访问。
minikube service service-hellok8s-nodeport --url
# http://127.0.0.1:50896
# Because you are using a Docker driver on windows, the terminal needs to be open to run it.
curl http://127.0.0.1:50896
# [v3] Hello, Kubernetes!, From host: hellok8s-deployment-559cfdd58c-zp2pc
curl http://127.0.0.1:50896
# [v3] Hello, Kubernetes!, From host: hellok8s-deployment-559cfdd58c-2j2x2
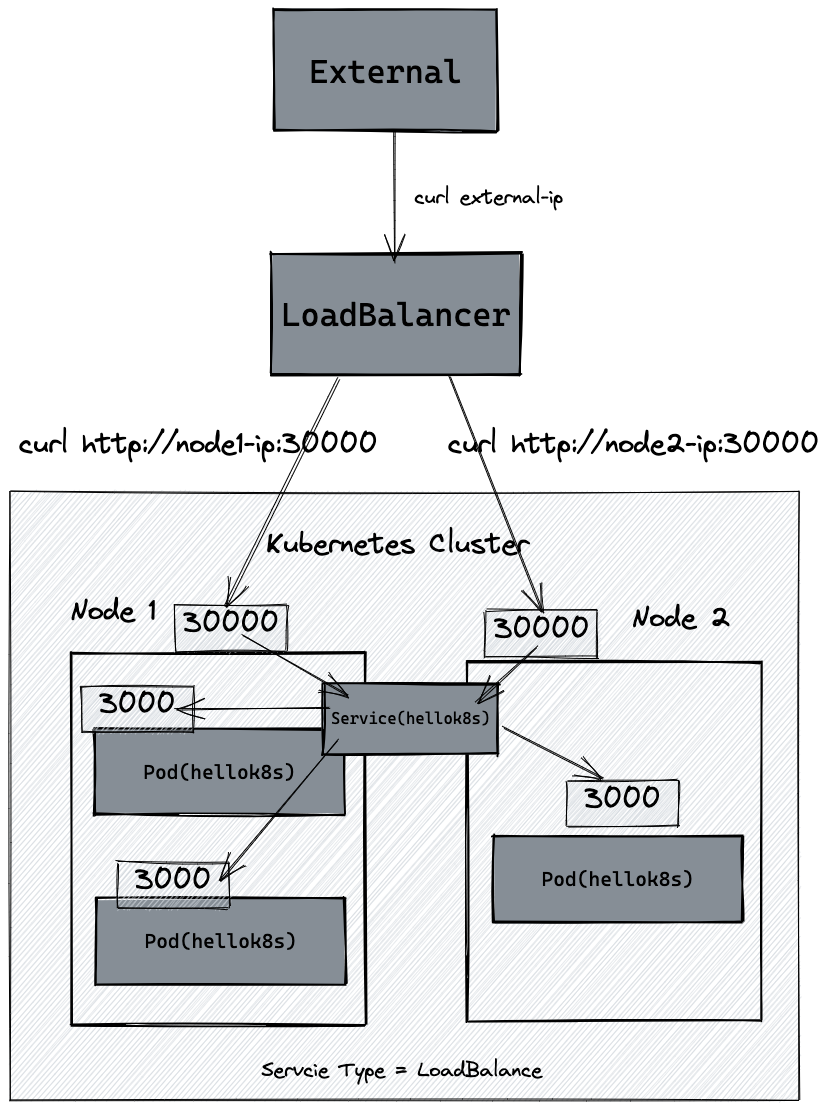
LoadBalancer 是使用云提供商的负载均衡器向外部暴露服务。 外部负载均衡器可以将流量路由到自动创建的 NodePort 服务和 ClusterIP 服务上,假如你在 AWS 的 EKS 集群上创建一个 Type 为 LoadBalancer 的 Service。它会自动创建一个 ELB (Elastic Load Balancer) ,并可以根据配置的 IP 池中自动分配一个独立的 IP 地址,可以供外部访问。
这里因为我们使用的是 minikube,可以使用 minikube tunnel 来辅助创建 LoadBalancer 的 EXTERNAL_IP,具体教程可以查看官网文档,但是和实际云提供商的 LoadBalancer 还是有本质区别,所以 Repository 不做更多阐述,有条件的可以使用 AWS 的 EKS 集群上创建一个 ELB (Elastic Load Balancer) 试试。
下图显示 LoadBalancer 的 Service 架构图。


