Read this in other languages: English | Indonesia
- 💬 Multi-Platform Support - Works with YouTube, TikTok, and Twitch
- 🗣️ Text-to-Speech - Multi-language TTS support with customizable avatar animations
- 💬 Multiple TTS Providers - Support for both Google Translate and TikTok voices
- 🗣️ Rich Voice Selection - Over 50 TikTok voices including character voices and singing voices
- 🎮 Easy OBS Integration - Simple browser source setup for chat display and TTS avatar
- 💬 Multi-Avatar System - Support for multiple active avatars with individual voice pools
- 🎨 Advanced Avatar Management - Customizable avatars with individual voice assignments and state management
- 🎯 Real-time Chat Display - Show highlighted messages on stream
- 🔧 Control Panel - User-friendly interface for managing all features
We contribute to the VTuber community through open-source tools, technical resources, and knowledge sharing.
Your support helps us continue building for the community!
-
Download the latest Windows release (.zip file) from our Releases Page
-
Extract the downloaded .zip file
-
Open the extracted folder and double-click
orionchat.exe -
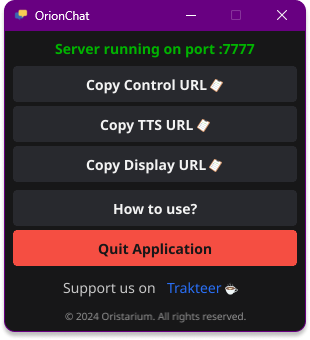
The app will open a status window showing the server is running on port 7777
-
Use the provided copy buttons to get the necessary URLs for your streaming setup
-
Keep OrionChat running while streaming
- In OBS Studio, go to "View" → "Docks" → "Custom Browser Docks..."
- In the popup window:
- Enter "OrionChat Control" for the Dock Name
- Enter
http://localhost:7777for the URL
- Click "Apply" then "Close"
- The Control Panel will appear as a dockable window in OBS
- You can now arrange it alongside your other OBS panels
- Open OBS Studio
- Right-click in the "Sources" panel
- Select "Add" → "Browser"
- Create new and name it (example: "OrionChat Display")
- Add these sources one by one:
- Individual Avatars:
http://localhost:7777/avatar/{avatar_id}(Width: 1080, Height: 1080) Note: You can add multiple individual avatar sources, each with its own ID
- Individual Avatars:
- Open VTube Studio
- Click the "+" button in the bottom right to add a new item
- Select "Web Item"
- Add these URLs one at a time:
- For Individual Avatars:
http://localhost:7777/avatar/{avatar_id}- Recommended size: 1080x1080 per avatar
- For Individual Avatars:
- Position and resize the web items as needed in your scene
- Use the OBS Control Panel dock to manage settings
Note: For more detailed information about Web Items in VTube Studio, please refer to the official VTube Studio Wiki.
- Make sure OrionChat is running before starting OBS or VTube Studio
- Test your setup before going live
- The Control Panel can be accessed from any browser at
http://localhost:7777 - Customize your avatar and chat display settings through the Control Panel
- For best results, keep the application running in the background while streaming
- If you can't see the chat or avatar, make sure OrionChat is running
- Try refreshing your browser sources in OBS or web widgets in VTube Studio
- Check if your antivirus is blocking the application
- Make sure you're using the correct URLs
- If nothing works, restart OrionChat and your streaming software
-
Multiple Independent Avatars
- Each avatar runs in its own browser source
- Avatars coordinate through a central queue system
- No overlapping speech between avatars
- Automatic avatar selection with weighted distribution
- Real-time state synchronization across all avatars
-
Voice Assignment
- Assign multiple voices to each avatar
- Random voice selection from avatar's voice pool
- Individual voice settings per avatar
- Preview voices in control panel
-
State Management
- Idle and talking states per avatar
- Automatic state transitions
- Synchronized animations
- No speech overlap between avatars
- Smart queuing system for messages
- Automatic cleanup of audio resources
- Browse all available avatars
- Preview idle and talking states
- View assigned voices for each avatar
- Direct links to individual avatar pages
- Real-time updates when avatars change
-
Google Translate TTS
- Simple language-based voices
- Supports multiple languages
-
TikTok TTS
- 50+ unique character voices
- Multiple voice styles per language
- Special character voices (Disney, Star Wars, etc.)
- Singing voices with different styles
- Preview audio samples for each voice
- Random voice selection from favorites
- View complete list of TikTok voices
TikTok voices include:
- 🎭 Character Voices (Disney, Star Wars, etc.)
- 🎵 Singing Voices
- 🌍 Multiple accents (UK, US, AU)
- 👥 Male/Female/Neutral options
- 🎬 Narrator/Storyteller voices
- 🎪 Fun/Novelty voices
- 🇮🇩 Indonesian
- 🇺🇸 English (US/UK/AU variants)
- 🇰🇷 Korean
- 🇯🇵 Japanese
- 🇫🇷 French
- 🇩🇪 German
- 🇪🇸 Spanish
- 🇵🇹 Portuguese
- And more...
- YouTube (Channel ID or Username or Live ID)
- TikTok (Username)
- Twitch (Username)
This project is licensed under the MIT License - see the LICENSE file for details.


