Drivers Management
Note: This feature is available in Enterprise, AWS, Team editions only.
CloudBeaver includes a selection of built-in drivers, but not all are preloaded with .jar files. This keeps the installation lightweight while allowing you to manage drivers as needed.
You can:
- Download missing driver files from official Maven and Git repositories if a listed driver isn’t fully installed.
- Add a custom driver if the one you need isn’t included.
Important: Only an administrator can perform these actions.
To begin adding a new driver, navigate to Administration -> Driver Management.
- Click Add to start adding a new driver.
- In the form, select a driver from the Driver Type dropdown menu.
- Fill in the necessary fields. For more details, see Driver parameters.
- Click Create to save the driver.
After creating the driver, upload binary files:
- Find your driver in the Driver Management list and select it.
- Open the Libraries tab.
- Click Add File to upload the required
.jarfiles. - Confirm that the files appear in the table.
- Click Save.
Once the binary files are uploaded, you can create a connection.

The Generic driver allows you to connect to databases that do not have a predefined JDBC driver. It works with any database that supports JDBC, giving you control to manually load the required JDBC library.
This driver is useful for connecting to custom or uncommon databases. It ensures flexibility in setting connection parameters, but you must ensure that the JDBC driver you provide is fully compatible with the database to avoid issues with connections or queries.
JDBC drivers use URLs to connect to databases, similar to web URLs. These URLs typically follow the
format jdbc:vendor:host:port/database.
Example: PostgreSQL database might use
jdbc:postgresql:localhost:5432/postgres.
If the required driver exists in the Driver Management list but its libraries haven’t been installed, you can download them.
- Go to Settings -> Administration -> Server Configuration.
- Enable Allow drivers downloading.
- Open the Libraries tab of the required driver in Administration -> Driver Management.
- Click Download to fetch
.jarfiles from an official Maven or Git repository. - Confirm that the files appear in the table.
- Click Save.
- Create a connection.
-
Open the required driver in Administration -> Driver Management.
-
Update the necessary fields. For more details, see Driver parameters.
Warning: Changing the driver class will delete the existing driver.
-
Click Save.
To reset a driver to its original settings:
- Open the required driver in Administration -> Driver Management.
- Click Reset to default.
Note: This option is only available for built-in drivers. Custom drivers cannot be restored to default.
Note: This action removes only the driver reference from the configuration file. To delete the driver file itself, go to your workspace and remove it manually.
- Open the Driver Management tab.
- Locate the driver you want to delete in the list.
- Check the checkbox next to the driver's name.
- Click the Delete button to remove the driver.
Tip: Instead of deleting a driver, you can disable it in the Server Configuration tab. For more details, see Server configuration administration.
You can filter drivers using three options:
- Search
- Custom/Default drivers
- Driver State (
Enabled/Disabled/All)
To access filter options, click the filter button:

| Parameter | Description |
|---|---|
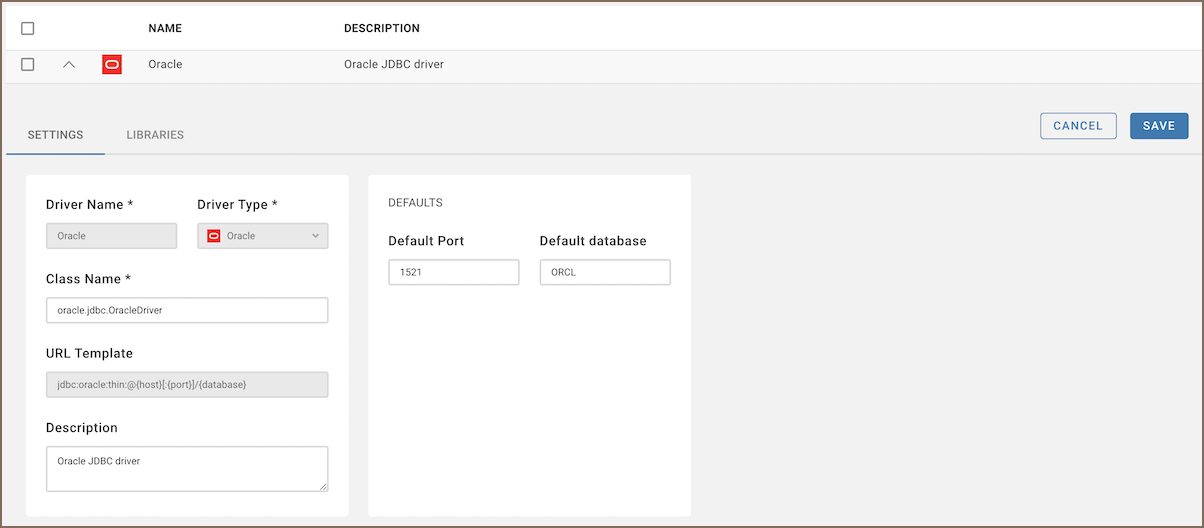
| Driver Name | The name you assign to the driver. This can be any descriptive name that helps you identify the driver among others. |
| Driver Type | Specifies the type of the driver used for connecting to the database. Users typically select the appropriate driver type based on the database being connected to. For unsupported databases, the Generic type is often used. For more information see section below. |
| Class Name | The fully qualified name of the Java class for the JDBC driver. This is the main class that Java uses to interact with the database. It can often be found in the driver's documentation or by inspecting the .jar file. |
| URL Template | A template for the database connection URL. If left empty, you must specify the JDBC URL manually for each connection. It's recommended to provide a template to simplify connection setup. For more information see section below. |
| Default Port | The port number typically used by the database. This is optional and can be left blank if the port is non-standard or varies between installations. |
| Default Database | The default database name to use for connections. This can simplify the setup process by pre-filling the database field when creating connections. Leave blank if no default database is applicable. |
| Description | A brief explanation or notes about the driver. This is useful for adding contextual information, such as the database type, special requirements, or any custom configurations. |
This section provides detailed instructions on how to add a new database driver through server configuration.
Note: These operations require server access and should be performed by users with appropriate permissions.
Tip: To add a custom driver to the CloudBeaver Docker image, you must build from the source. Modify the source code to include your driver, rebuild the project, and then create a new Docker image using the Docker packager. Changes cannot be made directly in the Docker container.
Driver dependencies are managed within the server configuration. To add a new driver:
- Navigate to the
server/driversdirectory. - Create a new folder for the driver you wish to add.
- Copy the POM (Project Object Model) file from an existing driver configuration into the new folder.
- Modify the POM file to reflect the new driver’s module name and dependencies.
PostgreSQL driver configuration example:
<project xmlns="http://maven.apache.org/POM/4.0.0" xmlns:xsi="http://www.w3.org/2001/XMLSchema-instance"
    xsi:schemaLocation="http://maven.apache.org/POM/4.0.0 http://maven.apache.org/xsd/maven-4.0.0.xsd">
    <modelVersion>4.0.0</modelVersion>
    <artifactId>drivers.postgresql</artifactId>
    <version>1.0.0</version>
    <parent>
        <groupId>io.cloudbeaver</groupId>
        <artifactId>drivers</artifactId>
        <version>1.0.0</version>
        <relativePath>../</relativePath>
    </parent>

    <properties>
        <deps.output.dir>postgresql</deps.output.dir>
    </properties>

    <dependencies>
        <dependency>
            <groupId>org.postgresql</groupId>
            <artifactId>postgresql</artifactId>
            <version>42.2.20</version>
        </dependency>
        <dependency>
            <groupId>net.postgis</groupId>
            <artifactId>postgis-jdbc</artifactId>
            <version>2.5.0</version>
        </dependency>
    </dependencies>

</project>To make the new driver available within the CloudBeaver platform, perform the following steps:
- Open the file
server/bundles/io.cloudbeaver.resources.drivers.base/plugin.xml. - Copy an existing driver configuration and adjust it for the new driver.
-
Resource Definition:
<resource name="drivers/driver-name"/>
This line specifies that the folder
drivers/driver-namecontains the necessary JAR files for the driver. -
Bundle ID:
<bundle id="drivers.driver-name"/>
This line is required for enabling the driver configuration within the DBeaver platform.
-
Driver ID:
<driver id="generic:driver-name"/>
This line enables the DBeaver driver in CloudBeaver. The driver ID should match the one specified in the database-specific
plugin.xmlfiles on the CloudBeaver platform.
- Application overview
- Demo Server
- Administration
- Server configuration
- Create Connection
- Network configuration settings
- Connection Templates Management
- Access Management
-
Authentication methods
-
Local Access Authentication

- Anonymous Access Configuration
- Reverse proxy header authentication
- LDAP
-
Single Sign On
-
SAML
-
OpenID
-
AWS OpenID
-
AWS SAML
-
AWS IAM
-
AWS OpenId via Okta
-
Snowflake SSO
-
Okta OpenId
-
Cognito OpenId
-
JWT authentication
-
Kerberos authentication
-
NTLM
-
Microsoft Entra ID authentication
-
Google authentication
-
Local Access Authentication
- User credentials storage
-
Cloud Explorer
-
Cloud storage
-
Query Manager
-
Drivers Management
- Supported databases
- Accessibility
- Keyboard shortcuts
- Features
- Server configuration
- CloudBeaver and Nginx
-
Domain manager
- Configuring HTTPS for Jetty server
- Command line parameters
- Local Preferences
- API
-
CloudBeaver Community
-
CloudBeaver AWS
-
CloudBeaver Enterprise
-
Deployment options
-
Development